Checking In Documents from MicroStation
To check in a document you must first close the document. The following actions will close the open document and prompt you to check it in:
- - After the new document is created, you are prompted to check in the previous document; once checked in, the new document opens.
- - After the new document is created, you are prompted to check in the previous document; once checked in, the new document opens.
- - After selecting another document to open, you are prompted to check in the previous document; once checked in, the selected document opens.
- - The open document is closed and you are prompted to check it in; once checked in, you can select another document to open or exit MicroStation.
- - The open document is closed and you are prompted to check it in; once checked in, MicroStation exits.
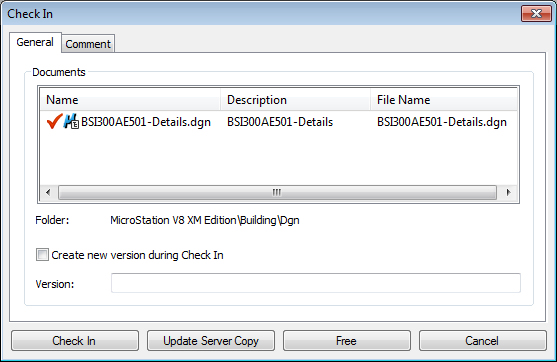
From the Check In dialog you can either check in the document, update the server copy of the document, or free the document, or you can simply click Cancel to close the previous document without performing any action on it (it will remain checked out).
Tip: If you want
your DGN documents to be checked in automatically when you close them (without
using the
Check In dialog), uncomment the
PW_CHECKINOPT variable in your
mcm.user.cfg file and set the value to
1. If this variable is set and audit trail is
configured to prompt you for comments upon check in, then an audit trail dialog
will still open for you to enter your change comments, whenever you close
checked out documents.
Check in the document when prompted
- Select to create a new
document or open a different document or close the current document.
The Check In dialog opens.
- If there is a
Comment tab, enter your comment in the
Enter comment field on the
Comment tab.
If you want to re-use a comment that you entered from a previous check-in, select a previous comment from the list.
- Click
Check In.
The document is checked in, and: